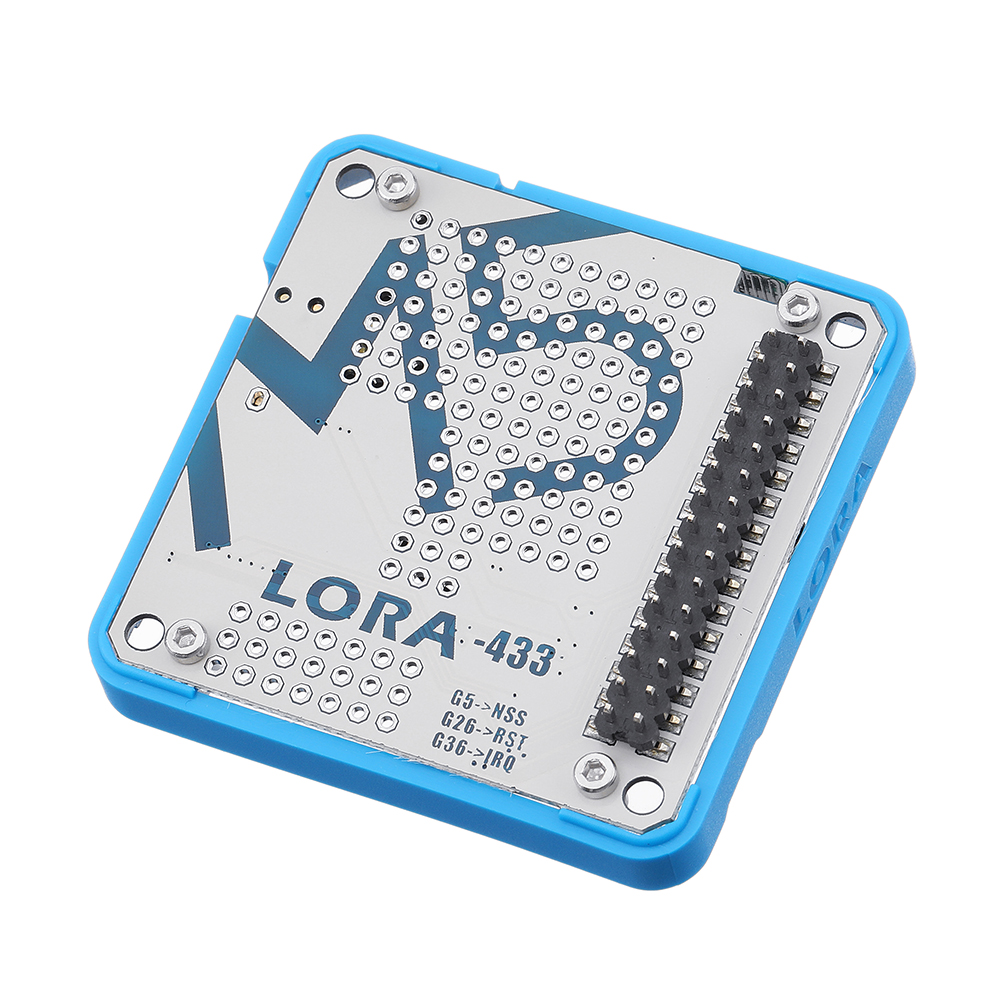
M5Stack® 433MHz Wireless LoRa Module for ESP32 DIY Development Kit Built-in Antenna IOT Development Board


Eachine1
sku: 1537061
ACCORDING TO OUR RECORDS THIS PRODUCT IS NOT AVAILABLE NOW
$9.95
Shipping from: China
Description
Description: LoRa integrated LoRa Module Ra-02, designed and produced by Ai-Thinker. On the board has some extra space left over, so we give you a prototyping area, it's great for adding on your customized circuit working with the LoRa Module. LoRa enables long-range transmissions (more than 10 km in rural areas) with low power consumption,The technology is presented in two parts: LoRa, the physical layer and LoRaWAN (Long Range Wide Area Network) the upper layers. LoRa and LoRaWAN permit long-range connectivity for Internet of Things (IoT) devices in different types of industries. Product Features: Lora Module: Ra-02 (by Ai-Thinker) Series Communication Protocol: SPI Universal Perboard Working Frequency: 433 MHz Supports FSK, GFSK, MSK, GMSK, LoRa and OOK modulation modes Receive sensitivity: lowest to -141 dBm Programmable bit rate up to 300Kbps Build-in PCB Antenna External Antenna port Program platform: Arduino, Mrcropython, UIFlow(Blockly) Product Size: 54.2mm x 54.2mm x 12.8mm Product weight: 14.5g Package Include: 1x M5Stack LoRa Module Applications: Automatic meter reading Home building automation Remote irrigation system Related Link: Offical Video Forum LoRa Info (LoRa) LoRaWAN Regional Parameters EasyLoader click to download EasyLoader 1.EasyLoader is a simple and fast program burner, and each product page has a product-related case program for EasyLoader. 2.After downloading the software, double-click to run the application, connect the M5 device to the computer via the data cable, select the port parameters, and click "Burn" to start burning. 3.The CP210X (USB driver) needs to be installed before the EasyLoader is burned. Click here to view the driver installation tutorial Example: for Arduino IDE These are the point-to-point communication examples between two LORA modules. The LoRa nodes send and receive messages. Blue string indicates sending succeed. Yellow string display the received messages. Red string indicates initialization failed. To get complete code, please click here #include #include //declaration String outgoing; // outgoing message byte msgCount = 0; // count of outgoing messages byte localAddress = 0xBB; // address of this device byte destination = 0xFF; // destination to send to //initialization M5.begin(); LoRa.setPins(); // set CS, reset, IRQ pin LoRa.begin(433E6); // initialize ratio at 915 MHz //send message void sendMessage(String outgoing) { LoRa.beginPacket(); // start packet LoRa.write(destination); // add destination address LoRa.write(localAddress); // add sender address LoRa.write(msgCount); // add message ID LoRa.write(outgoing.length()); // add payload length LoRa.print(outgoing); // add payload LoRa.endPacket(); // finish packet and send it msgCount++; // increment message ID } //receive message void onReceive(int packetSize) { if (packetSize == 0) return; // if there's no packet, return int recipient = LoRa.read(); // recipient address byte sender = LoRa.read(); // sender address byte incomingMsgId = LoRa.read(); // incoming msg ID byte incomingLength = LoRa.read(); // incoming msg length String incoming = ""; while (LoRa.available()) { incoming += (char)LoRa.read(); } } onReceive(LoRa.parsePacket());Copy to clipboardErrorCopied Schematic:
Price history chart & currency exchange rate
Customers also viewed

$13.68
Детская одежда, Новинка лета 2023, Детская футболка с коротким рукавом, цветные шорты из чистого хлопка с геометрическим рисунком, комплекты
aliexpress.ru
$8.32
American retro hiphop tide brand cotton short sleeved t-shirt men and women summer loose ins trend half sleeved T shirt shirts
aliexpress.ru
$71.49
Морские аксессуары, крестовый столбик, сменный полированный с базовой лодкой для яхты, нержавеющая сталь, долговечный стопорный столбик
aliexpress.ru
$7.22
Men's T-Shirt Shorts Suit Hawaiian Style Casual Fashion Half Zip Lapel Short Sleeve Polo Wear Men And Shorts Summer Clothing Set
aliexpress.ru
$6.72
Robert Jacob Gordon Poster Crassula Pyramidalis Thunb Dictyophorus Spumans Canvas Painting Art Print Wall Picture Home Decor
aliexpress.ru
$7.99
Smart Tri-fold Bracket Protective Cover for Apple IPad 2020 8th 10.2 7th Case IPad 5th 6th Gen /Mini 1 2 3 4 5 Gen Tablet Case
aliexpress.ru
$9.08
2023 New Arrival Mens Brand T-shirt High Quality Summer Daily Casual Sports Tee Shirts Male Gym Quick Dry Running Fitness Tops
aliexpress.com
$4.07
Headset holder Alloy Aluminium Headset support Soft TPE Pad Protection anti-scratch Sturdy Base removable Desk Headset Stand
aliexpress.com
$178.02
Huawei TalkBand B7 Smart Bracelet Heart Rate Blood Oxygen Health Monitoring AMOLED Screen Bluetooth Headset Wristband SmartWatch
aliexpress.com
$3.94
Fortnite Men and Women Victory Boys Girls Cartoon Jacket Tops Teen Clothes 3 To 14 Years Kids T-shirt Game 3D Printed Tshirt
aliexpress.com
$17.99
WOSAWE Cycling Vest Reflective Safety Bicycle Clothing Men Gilet Cut Wind Mtb Bike Back Breathable Mesh Sleeveless Windbreaker
aliexpress.com
$10.47
Складная телескопическая удочка ручка спининг Fishing Rod в виде ручки походная портативная, Черный
bigl.ua
$103.32
Luxurious Sexy Boho Hood Sleeve Wedding Dress A-Line Chiffon Applique Lace Princess Bridal Dress Arabian Country Style Guest Wed
aliexpress.com
$2.71
elbow & knee pads 1pcs 2021 support professional protective sports pad breathable bandage brace basketball tennis cycling, Black;gray
dhgate.com
$32.90
women's leggings 2021 mid waist full length slim feet printed flower autumn and summer high elastic female clothing v786, Black
dhgate.com
$27.15
running sets plus size xxxl tracksuit yoga sport wear woman sports fitness 2 piece set comfortable jogging suits for joggers women, Black;blue
dhgate.com
$3.41
korean version women pentagram necklace jewelry choker collares temperament pendants birthday gift, Silver
dhgate.com
$30.94
yolu 4 pcs high-brightness 5w wide-width lights 3030 1led wide-width lights license plate lamps tail box light door lamps
dhgate.com
$28.36
large pearl jewellery,charming luster rice lavender freshwater pearl loose beads one full strand 10-11mm, White
dhgate.com
$97.28
sarairis new ladies низкий каблук отдыха квартиры скольжения на сжатый flock квартиры женщин элегантный повседневная швейное обувь женщина, Black
dhgate.com
$2.29
tcoe5 губка anti-dust face печать защитная маска предотвращение пыле маска дышащий туман унисекса haze # 881
dhgate.com
$93.91
2020 женщин искусственного меха пальто новая мода женщины длинные printed письмо шинель куртка с капюшоном осень зима полный рукав теплый ca, Black
dhgate.com
$18.50
выход courage теперь загрузка пожалуйста, подождите тенниска людей напечатанный с коротким рукавом размер s-3xl формальное подарков смешной
dhgate.com
$18.50
freestyle skies t-shirtgood качество марка хлопок рубашка летний стиль прохладный сорочки лето с короткими рукавами
dhgate.com
$29.60
warning grill master at work warning unsolicited popular tagless tee t shirt 018028 sport hooded sweatshirt hoodie
dhgate.com
$29.72
summer 40th 50th 60th birthday t shirt youth has no age fathers funny gift novelty tee sport hooded sweatshirt hoodie
dhgate.com
$19.23
Top GUB C-68 Ceramic Bearings Bottom Bracket Crankshaft 68/73mm BSA Thread Type Bicycle Crankshaft Bearings Bicycle Axis
aliexpress.com


