Greensen Smart Tracking Car DIY Accessories Kit Electronic Component Set Smart Car DIY Kit

sku: 118141610
ACCORDING TO OUR RECORDS THIS PRODUCT IS NOT AVAILABLE NOW
$10.19
Shipping from: United States
Description
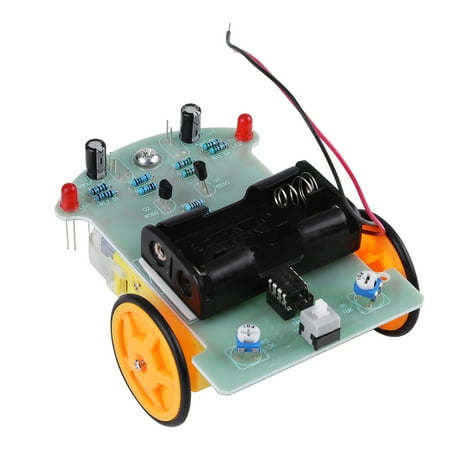
Features: This smart tracking car DIY kit can help you be familiar with mechanisms theory and learn about photoelectric sensor voltage comparator motor drive circuit and other related electronic knowledge in the process of assembling. Photosensitive resistor can detect the strength of the external light the stronger the outside light the smaller resistance will be. When red LED light is projected onto a white area and a black area due to different reflective rate photosensitive resistance will be different which is convenient for follow-up circuit controlling. LM393 is dual-channel voltage comparator integrated circuit composed of two independent precision voltage comparator. It is used to compare two input voltage and change output voltage according to input voltage. Special made motor has reduction gear and greatly reduces difficulty which is very suitable for use. LM393 compare two photosensitive resistance and stop one side motor when the resistance appears imbalance the other side motor rotate faster to get car back to the right direction. The whole process is a closed-loop control so it can control quickly and sensitively. Assembling Instruction: Step 1: Welding circuit Electric welding part is simpler welding sequence according to the principle of component level from low to high the first welding eight resistance is important to use multi meter to confirm resistance is correct. Step 2: Mechanical assembly The red line is connected to the 3V positive power supply the yellow line grounding excess wire can be used for motor wire. Step 3: The installation of a photoelectric circuit Photosensitive resistance and light-emitting diodes (note polarity) is reverse-mounted on the PCB and the ground distance is about 5 mm both photosensitive resistance and light-emitting diodes are 5 mm distance. Finally you can power test. Step 4: Vehicle debugging The right direction is along the universal wheel direction if you press and hold the left photo resistor the wheels on the right side of the car should be rotated. Press and hold the right photo resistor the wheels on the left side of the car should be rotated if the car driving back can also exchange the wiring of two motors if the one side normal and the other side back up as long as you can swap wiring of back side. Package Includes: 1 x Smart Car DIY Set (Disassembled Parts)
Price history chart & currency exchange rate
Customers also viewed

$53.73
Для экскаватора Vol-vo, аксессуары, детали двигателя, масляный фильтр 11708551 Голос 11708551 Ec210
aliexpress.ru
$40.61
Парик из натуральных волос на сетке Remy, бразильские прозрачные волнистые волосы 4x4, парик на сетке с застежкой, плотность 180%, волосы из клюквы 4x 4, парик на сетке спереди
aliexpress.ru
$38.25
Понижающий преобразователь постоянного тока от 24 В до 13,8 В, 50 А, 60 А, понижающий регулятор напряжения, трансформатор 13,8 В для автомобилей, сертифицированный CE
aliexpress.ru
$118.72
Mccarthy Белая африканская кружевная ткань с тяжелыми бисером, нигерийская ткань для жениха с блестками, свадебное платье, высокое качество, 5 ярдов, 2025 г.
aliexpress.ru
$7.28
НОВИНКА с инверсильным запираемым задним тормозом 100-типа, детали для электрических велосипедов, тормозные колодки, аксессуары для электрических велосипедов, B
aliexpress.ru
$6.87
2шт Хэллоуин крик громкоговоритель ужас звуковой плеер страшные звуки сенсор хитрый голосовой активация реквизит для дома с привидениями шумогенератор
aliexpress.ru
$3.29
Передняя и задняя дверная ручка автомобиля для Mazda 323 Protege BJ 1995 1996 1997 1998 1999 2000 2001 2002 2003 левая и правая
aliexpress.ru
$2.67
Fuel Valve Switch M10 x 1.25 Compatible for Atv 50/70/90/110/125cc Generator Oil Tank Gas Engine Parts
aliexpress.com
$44.11
10K Toner Cartridge Replace FOR OKI DATA OKIDATA OKI-DATA 46861341 46861342 FOR OKI DATA C824DN/C844DNW/C835DNW/C844NW/C824N
aliexpress.com
$1.07
Помощь в обучении бадминтону для начинающих, тренажер скорости бадминтона, тренировочное оборудование для ловли детей, садовых парков
aliexpress.ru
$9.21
Багажник на крышу каяка для доски для серфинга 6 м, стягивающиеся ремни, универсальные багажники, ремешок для закрепления ресниц с металлической пряжкой для камеры 500 кг
aliexpress.ru

$32.30
Motorcycle Rear Tour Pack LED Trunk Light Brake Taillight For Harley Touring FLHTCU FLHTCUL FLHTK FLHTKL FLTRU FLHTCUTG 2014-up
aliexpress.com
$14.76
Retro Midi Skirt High Waist Black Sexy Outfit Korean Style Skirts for Women 2023 Vintage Y2k Fashion Harajuku Women's Clothing
aliexpress.com
$1,600.00
2 кВт 3 кВт ручной волоконный лазерный сварочный аппарат 110 В 220 в сварочный аппарат Бесплатная доставка
aliexpress.com


$109.09
50pcs 655mmLED strip For Sam Sung Sharp-FHD 32''TV D2GE-320SC1-R0 CY-HF320BGSV1H UE32F5000AK ue32f5500aw UE32F5700AW HF320BGS-V1
aliexpress.com
$84.19
dress shoes vintage square toe women sandals white leather strap gladiator summer woman sandalias femmes apricot zapatos, Black
dhgate.com
$18.52
Sold by 6pcs--Lace women's cotton antibacterial boxer elastic breathable seamless print underwear
aliexpress.com
$116.00
Женское зимнее пальто с длинным рукавом, теплое однобортное Свободное пальто из искусственного меха с V-образным вырезом, новая модель C 803
aliexpress.ru
$45.11
Women Bag Original Box Date code Handbag Purse clutch shoulder messenger bag cross body multi pochette LVlouis
vitton, Red;black
dhgate.com
$415.65
3CT Paved White Gold SONA Simulate Diamond Star Engagement Gold Ring for Women Jewelry AU750 Gold Wedding Ring Solid 18K Gold
aliexpress.com

$135.47
Золотое кольцо Акулина в красном цвете с раухтопазом и фианитами 000124469 18 размера
rozetka.com.ua

$56.71
Boiler Heat Exchanger Replacement For Vaillant Eco TEC VSC INT 246/2-C 170 R1-0020038572 1 Pieces
aliexpress.com
$43.05
38CM Genuine Leather Car Steering Wheel Cover Cowhide Anti-slip for toyota mark 2 premio tundra venza land 80 100 200 fj cruiser
aliexpress.com
$36.11
GEMEIQ 2019 Autumn new flat women's shoes square head metal water drill square buckle shoes comfortable casual soft women's shoe
aliexpress.com
$5.56
Feidiao feidiao switch socket panel computer network cable socket network socket panel 86 A3 champagne gold
joybuy.com
$62.62
Автоматический 6-скоростной масляный поддон трансмиссии 6R80 BR3Z-7A194-A для Ford F-150 Lincoln Expedition Mustang 2011-2017 265-854
aliexpress.ru
$94.85
Европейский Декор для дома, креативный ангел, трехмерный настенный фон, настенное украшение, полимерный настенный держатель, подвесная полка
aliexpress.ru
$7.80
Браслет из стерлингового серебра 925 пробы, матовый бамбуковый золотой цвет, прозрачный браслет с фианитом для женщин и девочек, модные ювелирные изделия, подарок, Прямая поставка, оптовая продажа
aliexpress.ru
$22.25
Натуральный радужный лунный камень, кольцо из медной проволоки ручной работы, размер 9, N0c36
joom.ru
