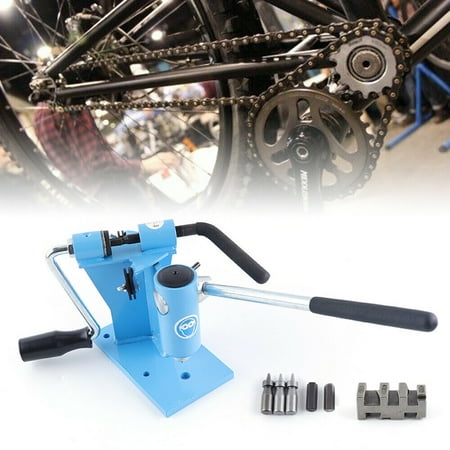
Chain Breaker and Chain Riveting Machine 2In1 Chain Breaker Chainsaw Bench Spinner Combo Professional Repair Tool Kits Archer Chainsaw Saw Chain Breaker Spinner Repair Tool Chain-Integrated Machine

sku: 516856718
ACCORDING TO OUR RECORDS THIS PRODUCT IS NOT AVAILABLE NOW
$96.00
Shipping from: United States
Description
Chainsaw Saw Chain Rivet Spinner Repair Tool professional Chain Saw Link Breaker Description Chainsaw Saw Chain Bench Breaker Spinner Combo Professional Repair Tool Kits This is the latest chain-breaking chain-integrated machine with a simple structure and a light overall design that meets the multiple functions of the repair chain. *Safety Information ●To avoid possible injury to operator and/or bystanders carefully read all instructions concerning assembly operation and maintenance of this tool. ●Make certain that chain breaker has been mounted securely on flat clean working surface. Check mounting regularly. ●Check components on chain breaker regularly for wear and general condition. ●Always wear approved safety accessories for hands and face when using this tool. Assembly Instructions Chain breaker comes supplied already assembled excluding handle portion (1).See exploded view of product. *BENCH MOUNTING Step 1. Chain breaker is equipped with two holes for mounting. Lag screws or bolts (not supplied) may be used to hold the unit in position. (llust A) ●Mount chain breaker unit flush with side or front of bench area. (llust A) *RIGHT OR LEFT HAND USE Chain breaker comes ready for right-handed use. If lft-handed use is preferred follow the instuctions below. Step 1. Unscrew set screw (3) and remove handle (1). (llust. B) Step 2. Remove plastic cap (5). With screwdriver depress spring-loaded punch holder (6) to free up cam (2). (llust. C-D) Step 3. Slide cam (2) out right side of chain breaker unit. (Ilust. E) Step 4. Reinsert cam (2) into opposite side of chain breaker unit. Depress punch holder (6) and insert cam. (llust. F) Step 5. Replace plastic cap (5) and reinsert handle (1). Tighten set screw (3) with Allen wrench (4). Step 6. Remove stop pin (10) from right side of unit and reinsert into left side. (llust. G) *REPLACING PUNCH Step 1. To remove worn or damaged punch (9) loosen set screw (7) with Allen wrench (4). (llust. H) Step 2. Insert new punch (9) into punch holder(6) (push punch up until fully seated). Tighten set screw (7). (lst.) *Instructions —HOW TO BREAK CHAIN Step 1. Insert chain portion to be broken into the slot of the adjustable anvil(llust. J)Tighten adjustment knob until chain is securely positioned. Position cutter as shown.( llust.K) IMPORTANT: It is not necessary to re-adjust anvil when breaking multiple loops of chain of the same chain type. Step 2. Position rivet head directly under punch and pull handle (1) down just far enough to push rivet out (do not use excessive force). (llust. L) NOTE: A. Important - when breaking chain at cutter make sure cutter is in correct position. (llust. M) B. For cutters with depth gauges as shown in (llust.. N) make sure to position cutter properly as shown in (llust. 0) using the side of the adjustable anvil with the slot. Operating Istuctins HOW TO SPIN RIVETS Step 1. Lay chain across plastic chain supports (8) (lust C) Step 2. Rotate plastic chain supports (8) so that the rivet head is centered between the take-up handle pocket (6) and spinner anvil (5). (lust. C) Step 3. Turn take-up handle (6) until chain is secured against spiner anvil (5). (lust D) Step 4. Tum sinner crank (1)a few times t0 center the rivet hub in the spinner anvil (5). (lust. E) Step 5. Apply a few drops of oil to rvethub. (lust. F) For additional instructions on the product please refer to the instructions. The kit includes: 1* broken chain anchor chain machine (integrated)
Price history chart & currency exchange rate
Customers also viewed

$42.17
IXO Diecast 1:24 Scale Citroen 2CV France Alloy Retro Car Model Finished Product Simulation Toy Collection Gift Static Model
aliexpress.com
$40.99
Blind Box Rolife Nanci Zodiac Anime Guess Bag Surprise Box Original Action Figure Cartoon Model Gift Toys Collection
aliexpress.com

$1.67
High-density Car Washing Sponges Large Honeycomb 8-shaped Sponges Block Car Cleaning Waxing Tools Cleaning Accessories
aliexpress.com
$0.74
Cotton Cats Paw Short Socks Gift Animal Fingers Sock Funny Candy Color Ankle Socks Cartoon Cotton Socks
aliexpress.com
$456.28
Autel Professional Drone Accessories Set For EVO Lite+ 2 Batteries 2 Propellers Smart Controller SE-Multi-charger
aliexpress.com
$32.81
Swimsuit Cover Up Women Bath Outlet Beachwear 2023 Kaftan Beach Knitted Top Exits Woman Tunic Suit Love Embroidered Round Neck
aliexpress.com
$47.15
Новая крышка ГРМ двигателя с масляным уплотнением 06K 109 210 AF для Audi A3 A4 A6 Q5 TT VW Golf Tiguan Scoricco Skoda Seat 2,0 T 06H109210Q
aliexpress.ru
$21.25
Car Door Handle Cover For Nissan Qashqai Rogue Sport 2008-2015 Car Decoration Cover Sticker Exterior Auto Accessories
aliexpress.com


$43.28
2020 New Dog Bag Breathable Dog Backpack Transparent Large Capacity Cat Carrying Bag Portable Outdoor Travel Pet Carrier M/L
aliexpress.com
$11.22
Hand-sewing Car Steering Wheel Cover Genuine Leather Braid With Needle Thread Fashionable Auto Interior Accessory protection
joybuy.com
$99.76
2-слойная туалетная бумага с тиснением Soft Professional Series, 16850, 450 листов в рулоне, 60 рулонов в футляре
aliexpress.ru

$21.27
License Plate Holder For Husqvarna Vitpilen 401 Svartpilen 401 2018 2019 2020 2021 2022 2023 Tail Tidy Fender Eliminator Kits
aliexpress.ru
$90.29
Jeep Мужские дышащие нескользящие утепленные низкие треккинговые ботинки с амортизацией - хаки, цвет Khaki
cdek.shopping
$90.45
LiNing Безумный забег X3 противоскользящие износостойкие низкие беговые кроссовки мужские черные
cdek.shopping
$54.68
0281002500 0281002295 Common Fuel Rail Pressure Regulator For Citroen Jumper For Fiat Ducato for IVECO Daily for Peugeot Boxer
aliexpress.com
$36.90
FD7-j68336255AB Car Ignition Power Switch Push Start Stop Button Engine Start Switch for Chrysler
aliexpress.com

$13.89
CAB66455,50711-S9A-000,50711SWA010 Control Arm Bushing For HONDA CR-V 97-,CIVIC 87-06,STEP WGN 96-09
aliexpress.com

$13.90
Спортивная чашка для бутылки с водой на 32 унции с вдохновляющей отметкой времени и съемным фильтром подходит для фитнеса и транспортировки на открытом воздухе
joom.ru

